Over at Daniel Gray’s blog, a simple observation has been made. One which has probably been observed by most of us at one point or another and especially for long journeys – Why can’t I have one train ticket for one trip?
Upon first glance, it’s not a particularly extravagant request. One journey, one ticket. Of course, as we (and by we I mean those in the UK) know, train operators don’t see it this way. If I have three trains to catch in order to get from point A to point B, they see that as three journeys, not one and so issue us with three lots of tickets accordingly. Things get even worse if you plan on returning from your destination as well, as that doubles the amount of tickets! Things get even worse if your travels include seat reservations.
As Daniel points out, it’s absurd. Why can’t I have my entire journey on one ticket? Is that so hard? I’m not so sure it is, but rather train operators have been using the same method of designing/printing tickets for so long that the problems have become compounded as new methods of actually purchasing tickets and/or services come along without any support for them on whatever proof of purchase the operator wishes to give to the customer. In this case, a train ticket.
With the above in mind, I decided to take a stab at what a new ticket could look like. I had a few key goals.
Don’t reinvent the wheel
There are hundreds of trains, stations and ticket vendors in the UK most of which use the same format of ticket. Because of this, there will be tens of thousands of blank ticket stock already printed with the trademark orange trim and Rail Settlement Plan watermark. With public transport already suffering from a lack of investment, no one needs to spend an excessive amount of money getting a new format of train ticket into circulation. Keep the physical ticket that already exists and improve it, rather than starting afresh.
Everything on the ticket needs to be printable
Currently, when you purchase a train ticket, everything besides the orange trim and watermark is printed right there and then. This includes all category headings like “Destination” or “Price”. This means no pre-printed bars/blocks/colours/logos. Why is this important? With more and more people buying their tickets online before they travel, vendors are now supplying all journey-related information on a ticket. This includes a receipt for the ticket and credit card receipt. As time goes on, there will undoubtedly be other uses for the tickets besides the journey itself and it’s important to keep this in mind.
Reduce the need for extra tickets
Again as above, more people are buying their ticket in advance of their journey and that can sometimes mean they’re able to book specific seats and specific trains. Currently, if you do this, you’ll be given a separate ticket for your reservation, along with one for the journey itself. One of the main goals of the ticket redesign is to reduce the need for these extra tickets by including everything on one ticket instead.
Assume all current information is important
It would be easy to discard some information that already exists on today’s train tickets like price (because you’ve already bought it), ticket number (because that’s unimportant to the customer) or the time the ticket was printed. However, one way or another, that information is important at some stage of your journey. It may not be important to you at the time, but may well come in handy for things like lodging a complaint afterwards and being asked to see proof of purchase.
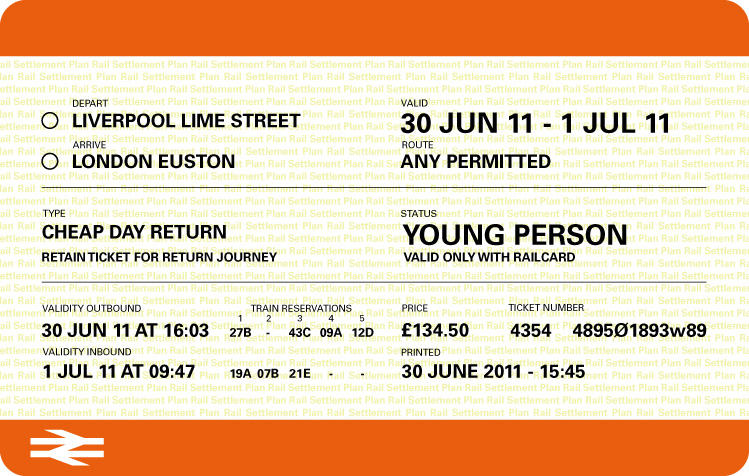
And this is what I came up with.

Now, you might be thinking “It doesn’t look much different”, but as I said, my aim wasn’t to reinvent the wheel. It was to solve the main problem of reducing the need for multiple tickets and I believe this does that.
Features
One ticket for one journey – Single or return
This ticket allows the customer to go to and from their destination when purchasing a return ticket, even though there’s only one departure/arrival station. When the customer is asked to present their ticket going to their inital destination (in this case London Euston), the inspector ticks off the arrival station to show that the customer is indeed on the way there. On the way back (in this case to Liverpool Lime Street), the inspector ticks off the departure station. The ticket then has two ticks on it, showing full use.
Most important information at the top
On current tickets, information is spread out in no sensible way. This changes things by placing departure/arrival stations at the top, along with the validity of the ticket.
Multiple seat reservations now on one ticket
Even if your journey has five different trains involved, this ticket will allow you to view your seat reservations for them. If some of your trains don’t have reservations, then that train number has a dash instead of a seat number.
Information moved out of the orange trim
I believe that the orange trim should stay clear as this is a border, not a margin. With that in mind, printing information (along with price and ticket number) have been grouped together, finishing off the ticket in a nicer way.
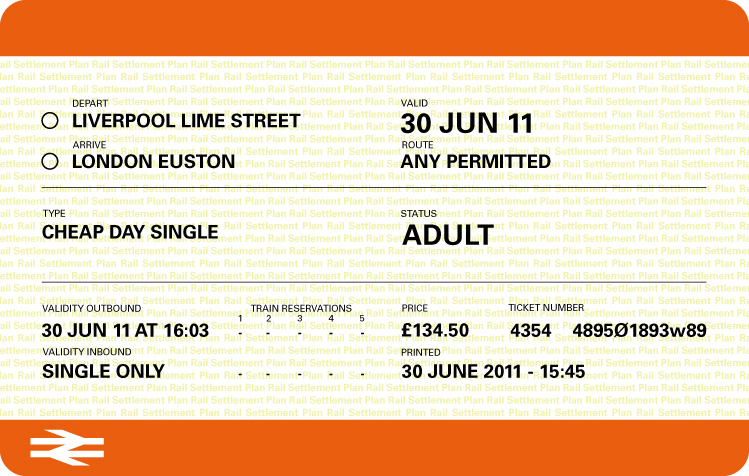
Works just as well for single journeys
Since some journeys aren’t as complex as a 5-train nightmare, here’s an example of how the ticket would look for those on a single ticket.

This time, validity is one day only instead of a range of dates with the return. It also shows a zeroing out of all train reservations. This particular ticket would be more likely to be used on inner city train travel, where train reservations aren’t a requirement.
Although this doesn’t introduce anything new from an eye-candy design perspective, I do believe it starts to address the main problem that many people have of too many tickets for a single trip. In fact, the only thing I’ve done is rearranged the information and added one category (train reservations). Everything else is already present on today’s tickets. Granted, I’ve used Univers for the typeface which isn’t going to be available for ticket printing machines, but again, even with the correct typeface being used, I believe this moves one step closer to solving our train ticket problems.
See also: Tyler Thompson’s attempt to redesign a plane boarding pass.

 This new design, while quite simple is much better at displaying information and to whet your appetite for it, here’s a small shot of it. The site should be ready within the next two days. Until then, I’ve taken down my current design and replaced it with a Coming Soon image, as the current design wasn’t really serving any purpose anyway. I’m looking forward to launching this site and hopefully driving more traffic to it and in turn, driving more traffic to this blog for comments on my work.